After a long day of hiking, fishing, or just soaking up nature, the last thing you want is to stress over what’s for dinner.
These camping dinner ideas will transform your outdoor cooking game and have your fellow campers begging for seconds.
No fancy equipment needed – just simple ingredients and techniques that work perfectly over a campfire or camp stove.
One-Pot Pasta Wonder

This hearty pasta dish cooks everything in a single pot, making cleanup a breeze when you’re miles from running water.
Start by heating olive oil in your largest camping pot over medium heat on your camp stove or grate.
Add diced onions and garlic, letting them sizzle until fragrant and golden.
Toss in your favorite pasta – penne or rotini work best because they hold onto the sauce.
Pour in enough broth or water to cover the pasta by about an inch, then add canned diced tomatoes.
Season generously with Italian herbs, salt, and pepper, then bring everything to a rolling boil.
Reduce heat and let it simmer, stirring occasionally to prevent sticking.
As the pasta cooks, the liquid reduces into a rich, flavorful sauce that coats every piece.
Add pre-cooked sausage or leftover grilled chicken during the last few minutes for protein.
Throw in a handful of fresh spinach or frozen peas right before serving – they’ll wilt perfectly from the residual heat.
Top each bowl with parmesan cheese and crushed red pepper flakes for extra flavor.
The beauty of this meal lies in its flexibility – swap vegetables based on what you packed or what’s available at nearby stores.
Mushrooms, bell peppers, or zucchini all work wonderfully in this versatile dish.
Leftover pasta tastes even better the next day, making it perfect for lunch too.
You can prep all your vegetables at home and store them in labeled containers for super easy assembly at camp.
This recipe easily scales up for larger groups – just use a bigger pot and multiply the ingredients accordingly.
Foil Packet Fish and Veggies

Foil packet cooking eliminates the need for multiple pans while infusing incredible flavors into your meal.
Choose firm white fish like cod, halibut, or mahi-mahi that won’t fall apart during cooking.
Cut your fish into individual serving portions and season with lemon juice, salt, and your favorite herbs.
Slice vegetables into similar-sized pieces so they cook evenly – zucchini, bell peppers, and cherry tomatoes work perfectly.
Create individual foil packets by laying out large sheets of heavy-duty aluminum foil, shiny side down.
Place each fish portion in the center of a foil sheet, then surround with your prepared vegetables.
Drizzle everything with olive oil and add pats of butter for richness.
Season each packet individually with garlic powder, dried dill, and a squeeze of fresh lemon.
Fold the foil carefully, creating a sealed envelope that traps steam and flavors inside.
Make sure your seals are tight to prevent juices from leaking out during cooking.
Place packets directly on hot coals or on a grate over medium heat for about 15-20 minutes.
The fish is done when it flakes easily with a fork and reaches an internal temperature of 145°F.
Open packets carefully to avoid steam burns – the aroma that escapes will make everyone’s mouth water.
Serve directly from the foil for minimal cleanup, or transfer to plates if you prefer.
This cooking method keeps fish incredibly moist while allowing vegetables to steam in their own juices.
You can prep these packets hours ahead and keep them chilled until cooking time.
Campfire Chili Mac

This comfort food combination brings together two camping favorites in one satisfying skillet.
Start by browning ground beef in a large cast iron skillet over your campfire or camp stove.
Break up the meat as it cooks, ensuring even browning and no large chunks remain.
Add diced onions and bell peppers to the beef, cooking until vegetables soften and become translucent.
Stir in minced garlic and let it cook for just thirty seconds until aromatic.
Season the mixture with chili powder, cumin, paprika, and a dash of cayenne for heat.
Pour in canned diced tomatoes, tomato sauce, and beef broth to create a rich base.
Add kidney beans and black beans for protein and heartiness – drain and rinse them first.
Bring the mixture to a bubbling simmer, then reduce heat and let it cook for twenty minutes.
Meanwhile, cook elbow macaroni according to package directions in a separate pot.
Drain the pasta and add it directly to your chili mixture, stirring to combine thoroughly.
The pasta will absorb some of the liquid, creating a perfect consistency that’s neither too soupy nor too dry.
Top generously with shredded cheddar cheese, letting it melt into gooey perfection.
Add dollops of sour cream and sprinkle with chopped green onions for freshness.
This one-skillet wonder feeds a crowd and tastes even better as leftovers the next day.
You can easily adjust the spice level by adding more or less chili powder and cayenne.
Serve with cornbread or crusty rolls for a complete, filling meal that’ll warm you up on cool evenings.

🗼 I Wrote a Book About My Japan Travel Catastrophes!
Before I landed in Tokyo, I thought I was the “Final Boss” of international travel. Spoiler alert: I WASN’T. 😅
🚅 I boarded the wrong Shinkansen and ended up in THE WRONG CITY. I confused locals with my “expert” bowing that was more awkward than accurate. I accidentally stumbled into a high-stakes Kendo practice thinking it was a tourist show. Sound like something you’d do?
“Things I Wish I Knew Before Going to Japan” is your shortcut to avoiding ALL my cringe-worthy mistakes. ✨ Inside, you’ll find practical, LIFE-SAVING tips on etiquette, transport, money, and hidden gems that will save you time, money, and a whole lot of confusion.
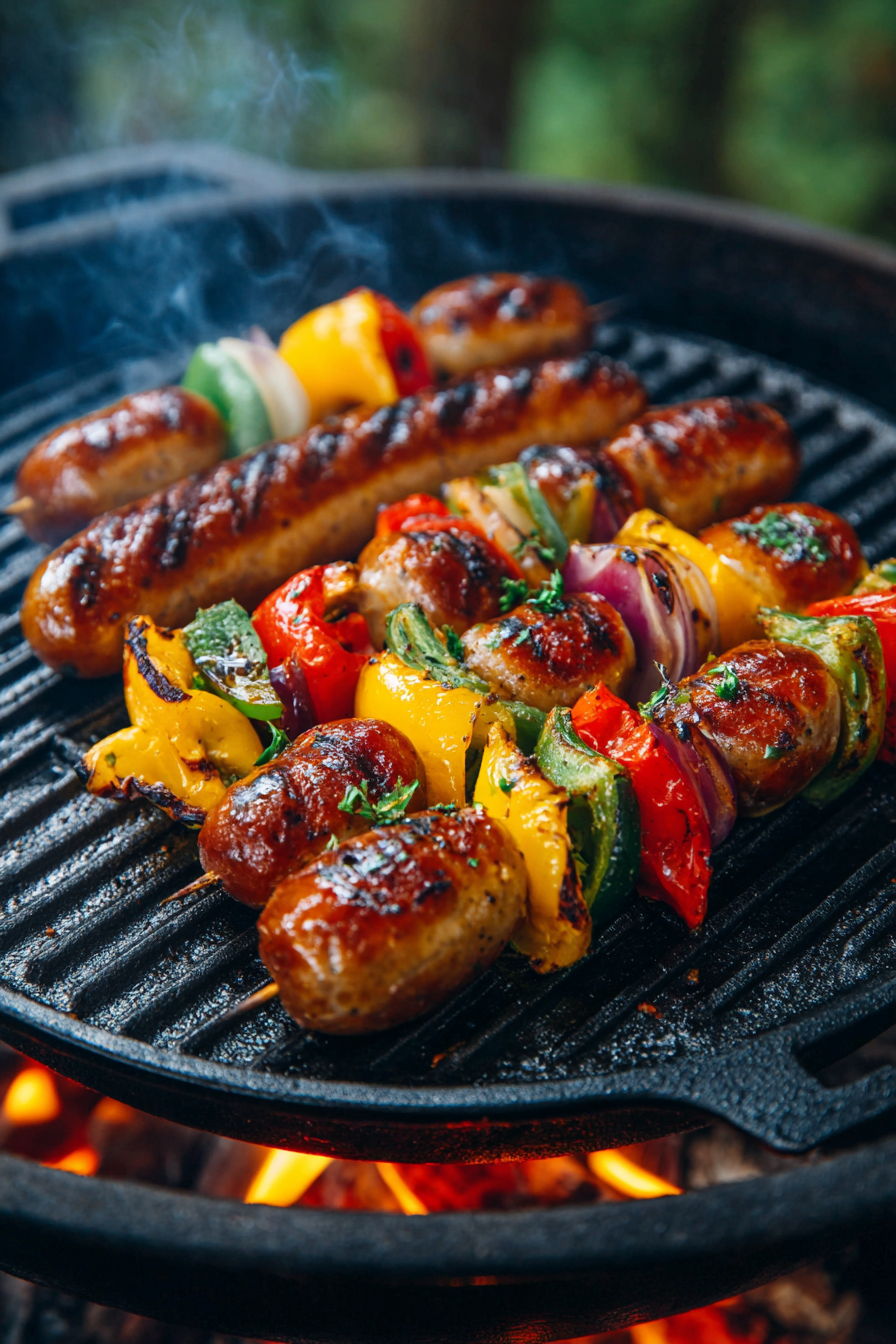
Grilled Sausage and Pepper Skewers

These colorful skewers cook quickly and provide a perfect balance of protein and vegetables in every bite.
Choose high-quality sausages like Italian, bratwurst, or kielbasa that hold their shape when grilled.
Cut sausages into thick rounds, about one inch thick, to ensure they stay on the skewers securely.
Slice bell peppers into large squares that will fit nicely between sausage pieces.
Cut red onions into chunks that match the size of your peppers for even cooking.
Thread ingredients onto metal skewers, alternating sausage, peppers, and onions for visual appeal.
Brush everything lightly with olive oil to prevent sticking and promote even browning.
Season the skewers with garlic powder, dried oregano, and freshly cracked black pepper.
Preheat your grill grate over medium-high heat, ensuring it’s clean and well-oiled.
Place skewers on the grill and cook for about twelve to fifteen minutes total.
Turn them every three to four minutes to ensure all sides get beautifully charred.
The sausages should develop a golden-brown crust while the vegetables become tender and slightly caramelized.
Watch for flare-ups from dripping fat and move skewers to cooler spots if needed.
Test doneness by cutting into a piece of sausage – it should be heated through with no pink remaining.
Serve immediately while everything is still sizzling hot and full of smoky flavor.
These skewers pair wonderfully with grilled corn on the cob or a simple green salad.
You can prep these hours ahead and keep them chilled until grilling time arrives.
Easy Camping Tacos

Tacos offer endless customization options while keeping prep work simple and ingredients minimal.
Brown ground beef or turkey in a large skillet over medium-high heat, breaking it up as it cooks.
Season the meat with taco seasoning, or make your own blend with chili powder, cumin, and garlic powder.
Add a splash of water and let the seasoning coat the meat evenly as it simmers.
Warm flour or corn tortillas by wrapping them in damp paper towels and heating for thirty seconds.
Alternatively, char them directly over the campfire for a smoky flavor that adds character.
Set up a taco bar with all your favorite toppings arranged in separate bowls or containers.
Shredded lettuce, diced tomatoes, and grated cheese form the classic foundation.
Add diced onions, jalapeños, and fresh cilantro for authentic Mexican flavors.
Don’t forget the salsas – mild, medium, and hot varieties satisfy different heat preferences.
Sour cream and guacamole provide cooling contrasts to spicy elements.
Black beans and corn can stretch the meal further while adding nutritional value.
Let everyone build their own tacos exactly how they like them – kids especially love this interactive approach.
Hard taco shells work well too, though soft tortillas are less likely to break during transport.
Leftover taco meat makes excellent breakfast burritos the next morning when scrambled with eggs.
This meal works equally well with grilled chicken, fish, or even vegetarian options like seasoned beans.
The beauty lies in using whatever ingredients you have on hand or can easily find at local stores.
Hearty Lentil Stew

This protein-packed stew proves that vegetarian camping meals can be just as satisfying as meat-based dishes.
Start by heating olive oil in a large Dutch oven or heavy pot over medium heat.
Sauté diced onions, carrots, and celery until they begin to soften and release their natural sweetness.
Add minced garlic and cook for another minute until fragrant throughout the pot.
Stir in dried lentils – red lentils cook fastest, but green or brown varieties work equally well.
Pour in vegetable or chicken broth, ensuring liquid covers lentils by at least two inches.
Add canned diced tomatoes, bay leaves, and dried thyme for depth of flavor.
Season generously with salt and pepper, then bring everything to a rolling boil.
Reduce heat to low and let the stew simmer gently for thirty to forty-five minutes.
Stir occasionally to prevent sticking and add more broth if the mixture becomes too thick.
Taste and adjust seasonings as the flavors develop and concentrate during cooking.
Add chopped spinach or kale during the final five minutes for extra nutrition and color.
The lentils should be tender but not mushy when the stew is finished cooking.
Remove bay leaves before serving – they’ve done their job of infusing subtle flavor.
Serve with crusty bread or crackers for dipping and extra heartiness.
This stew actually improves overnight, making it perfect for meal prep or multiple-day camping trips.
Freeze individual portions at home and reheat them easily over your camp stove for quick meals.
BBQ Chicken Foil Packets

These individual packets lock in moisture while infusing chicken with smoky barbecue flavors.
Choose boneless, skinless chicken thighs for the best results – they stay moister than breasts during cooking.
Cut chicken into bite-sized pieces that will cook evenly and quickly in the foil packets.
Toss chicken pieces with your favorite barbecue sauce, ensuring every piece gets well coated.
Add diced potatoes, cut into small cubes so they cook through in the same time as chicken.
Include bell peppers and onions for sweetness and crunch that complements the smoky flavors.
Lay out large sheets of heavy-duty aluminum foil, creating individual serving portions.
Divide the chicken and vegetable mixture evenly among the foil sheets.
Add an extra drizzle of barbecue sauce and a pat of butter to each packet for richness.
Season with garlic powder, onion powder, and a touch of smoked paprika.
Fold foil carefully into sealed packets, ensuring no juices can escape during cooking.
Place packets on hot coals or on a grill grate over medium heat.
Cook for twenty-five to thirty minutes, flipping once halfway through cooking time.
Check doneness by carefully opening one packet – chicken should reach 165°F internal temperature.
Potatoes should be fork-tender and vegetables should have some bite remaining.
Open packets carefully to avoid steam burns, then serve directly from the foil.
The barbecue sauce caramelizes beautifully, creating a glaze that coats everything perfectly.
Campfire Pizza

Making pizza while camping might sound impossible, but this method delivers crispy, delicious results.
Start with pre-made pizza dough from the grocery store – it travels well and saves significant prep time.
Let the dough come to room temperature before working with it for easier stretching.
Oil a large cast iron skillet or Dutch oven to prevent sticking and create a crispy bottom crust.
Stretch the dough to fit your pan, working from the center outward with gentle pressure.
Let the dough rest for ten minutes to relax the gluten and prevent shrinking during cooking.
Place the skillet over medium heat and cook the bottom of the dough for five to seven minutes.
You’ll hear it sizzling as the bottom develops a golden, crispy crust.
Flip the pizza carefully using a large spatula or by inverting it onto a plate first.
Quickly add your sauce, spreading it evenly but leaving a border for the crust.
Top with mozzarella cheese and your favorite toppings – keep them simple for best results.
Cover the skillet with a lid or aluminum foil to create an oven effect.
Cook for another eight to ten minutes until cheese melts and bubbles beautifully.
Check the bottom occasionally to ensure it doesn’t burn – adjust heat as needed.
The combination of direct heat below and trapped steam above creates perfect cooking conditions.
Slice and serve immediately while the cheese is still gooey and the crust is crispy.
This method works equally well for breakfast pizzas topped with eggs and bacon.
Simple Beef and Bean Burritos

These portable, filling burritos satisfy hearty appetites while being easy to eat around the campfire.
Brown ground beef in a large skillet, breaking it into small pieces as it cooks.
Season generously with cumin, chili powder, garlic powder, and a pinch of oregano.
Add refried beans directly to the beef, stirring until heated through and well combined.
The beans help stretch the meat while adding protein and fiber to the filling.
Warm large flour tortillas by wrapping them in damp paper towels and microwaving briefly.
If you don’t have a microwave, warm them individually in a dry skillet for thirty seconds per side.
Lay tortillas flat and add the beef and bean mixture down the center of each one.
Top with shredded cheese, diced onions, and a spoonful of salsa.
Add lettuce and tomatoes if you want extra freshness and crunch in every bite.
Roll burritos tightly, tucking in the sides as you go to prevent filling from spilling out.
For extra flavor, brown the assembled burritos seam-side down in the skillet for two minutes.
This creates a crispy exterior while warming the filling and melting the cheese completely.
Wrap finished burritos in aluminum foil to keep them warm and make them easier to handle.
These travel well and can be eaten with one hand, making them perfect for outdoor dining.
Prepare the filling ahead of time and assemble burritos just before serving for best results.
Leftover filling makes an excellent topping for baked potatoes or nachos the next day.
🗼 I Wrote a Book About My Japan Travel Catastrophes!
Before I landed in Tokyo, I thought I was the “Final Boss” of international travel. Spoiler alert: I WASN’T. 😅
🚅 I boarded the wrong Shinkansen and ended up in THE WRONG CITY. I confused locals with my “expert” bowing that was more awkward than accurate. I accidentally stumbled into a high-stakes Kendo practice thinking it was a tourist show. Sound like something you’d do?
“Things I Wish I Knew Before Going to Japan” is your shortcut to avoiding ALL my cringe-worthy mistakes. ✨ Inside, you’ll find practical, LIFE-SAVING tips on etiquette, transport, money, and hidden gems that will save you time, money, and a whole lot of confusion.
Hot Dog and Bean Skillet

This nostalgic combination brings back childhood memories while providing a quick, satisfying meal.
Slice hot dogs into rounds about half an inch thick for even cooking and easy eating.
Heat a large cast iron skillet over medium heat and add the sliced hot dogs.
Cook until they develop a nice brown color and slightly crispy edges on both sides.
Add diced onions to the skillet and cook until they become translucent and slightly caramelized.
Pour in canned baked beans, including all the sweet, smoky sauce they come in.
Stir everything together, letting the flavors meld as the mixture heats through completely.
Season with a dash of Worcestershire sauce and a sprinkle of brown sugar for extra depth.
Add a squirt of yellow mustard and a splash of ketchup for tangy sweetness.
Let the mixture simmer gently for ten to fifteen minutes, stirring occasionally.
The sauce will thicken slightly as it cooks, coating the hot dogs and creating rich flavor.
Taste and adjust seasonings – you might want more sweetness or a touch of hot sauce.
Serve directly from the skillet with thick slices of buttered bread for dipping.
This hearty meal sticks to your ribs and provides comfort food satisfaction after active days.
Kids absolutely love this combination, making it perfect for family camping trips.
The leftovers reheat beautifully and taste even better the next day as flavors continue developing.
You can easily double or triple this recipe to feed larger groups using a bigger skillet.
These dinner ideas prove that camping meals don’t have to be complicated or boring.
With minimal prep work and simple cooking techniques, you’ll create memorable meals that become part of your outdoor adventure stories.
Pack your ingredients, fire up that camp stove, and get ready to eat better in the wilderness than you do at home.